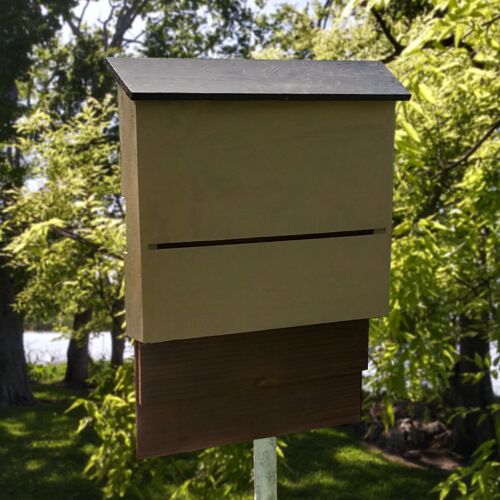

I know that not everyone likes bats, but there’s something that I know everyone dislikes for certain. Mosquitos. Do you know what eats mosquitos? Bats eat mosquitos. And…now we all like bats. The best way get rid of mosquitos is by installing a bat house in your yard.
In this post, I’ll show you how to build a DIY bat house that is designed hold enough bats to clear your property of thousands of bugs every night for under $100. That’s the best pest control you can buy for your money!
Bats don’t just eat mosquitos, they feast on them. Bats are capable of eating 600 insects per hour. They also eat agricultural pests. The U.S. National Parks Service says that bats do more than $3.7 billion worth of pest control each year in the U.S and they can be found in every state.
Not only are they great to have in your backyard, but they’re essential to the health of global ecosystems. The Bat Conservation International says bats provide vital ecosystem services in the form of insect pest consumption, plant pollination, and seed dispersal.
The bad news is the population of bats is declining. Bats are under an unprecedented threat from widespread habitat destruction, hunting, accelerated climate change, invasive species, and other stresses. But it’s the loss of natural habitats that remain the most widespread peril for bats worldwide.
The good news is that we can help by replacing some of the destruction of their natural habitat with man-made habitats.
DESIGN
While I was planning the design for this bat house, I referred to research done by the bat conservation pros such as Bat Conservation & Management and Bat Conservation International to increase my chances of bats moving in.
Bats prefer a cozy home that’s dark and has high ceilings. It must be ventilated in order to maintain the perfect temperature from day to night, but the vents cannot be too large or predators could get in. If the house is too small, they may look for another place to roost. If bats do decide to move in they are not going to want to share the space with others such as birds or wasps so the correct spacing inside is important to keep the competition out.
The house size should be no less than 24” wide and somewhere between 18”-24” tall on the inside. Our bat house is 24” wide by just under 24” tall, and including the landing zones, will be about 3 ft tall overall. The landing zone for a bat is like the driveway of your house. This is where they land before entering their home.
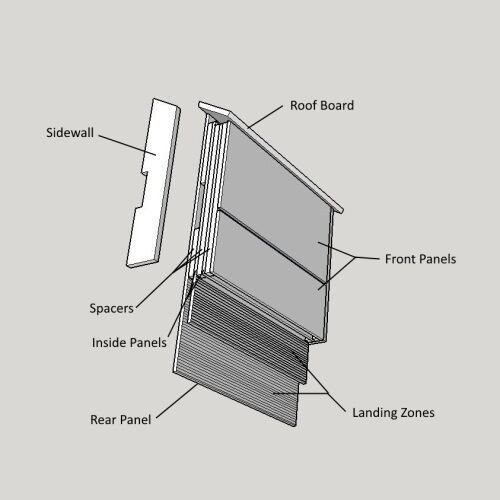
Bat houses can have living spaces, called chambers, ranging from 1 to hundreds of chambers. Most backyard bat houses range from 2-5 chamber designs. I chose a 3-chamber design for this bat house project. This design will hold about 150-200 bats total. Each chamber has ¾” wide space for the bats to climb from underneath and up into the house where they’ll hang. The panels on the inside stop about 3/4″ shy of the ceiling allowing the bats to move around from chamber to chamber without leaving the house.
No sense in spending money and time building something bats don’t want to live in. However, it’s not just the house design that’s important, but the location, color, and height as well. We’ll look at these later, but for now, let’s look at the materials and tools needed to do the job.
MATERIALS
The bat conservation pros recommend a bat house made with non-aromatic and non-treated wood.
The chambers are created by cutting spacers from a 1”x8” by 8 ft pine board. The roof board and sidewalls will also be cut from this board.
Because of the large, flat, minimum sizes required for bat houses, this calls for a 4×8 sheet of plywood for the rest of the parts.
All inside parts and surfaces will need to be sealed with a dark, water-based wood sealer to protect the house from bat droppings and urine.
The spacers and plywood panels will be sandwiched together and fastened with caulk and screws. In fact, all connecting parts will be caulked thoroughly to keep a tight seal against water and air intrusion.
The sidewalls will also be caulked and screwed into the sides of the assembled plywood panels, capping off the edges of the plywood with a good seal. The house’s exterior will be coated with exterior grade primer and paint.
And finally, the house will get a roof using roofing materials.
Here’s the materials list:
TOOLS
Fortunately, a project like this doesn’t require specialized tools to get the job done. Below is a list of tools and alternatives to help you get prepared.
Once you see what tools you may need to add to your collection and have a cut list in hand, it’s off to the hardware store for tools and materials.
The very first step in the building process is to cut all of the parts you need for your design.
The cut list includes:
All of the panels will be cut from the 4×8 sheet of plywood with some plywood leftover. Save it for another project.
The sides, spacers, and roof board will be cut from the 1”x8” by 8 ft pine board. You will need to nest the parts properly in order to get everything from one board.
The ¾” thickness of the board is what will give the space between each plywood panel.
Let’s start with the 1”x8” pine board.
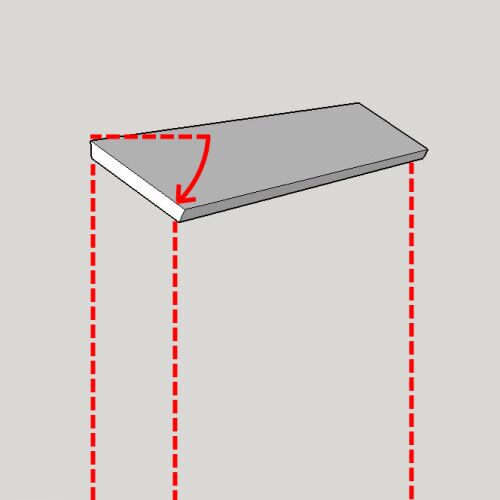
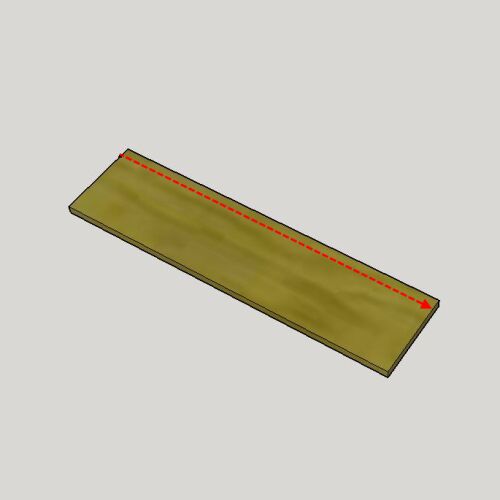
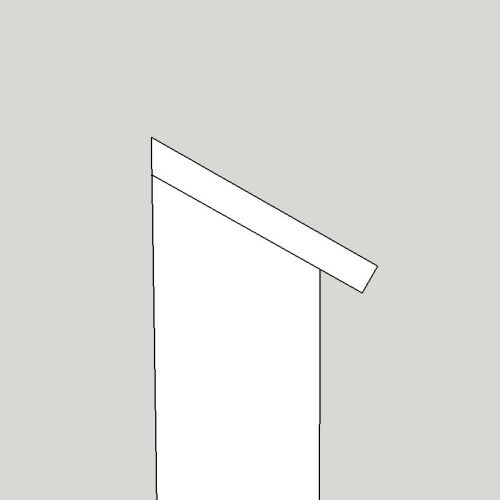
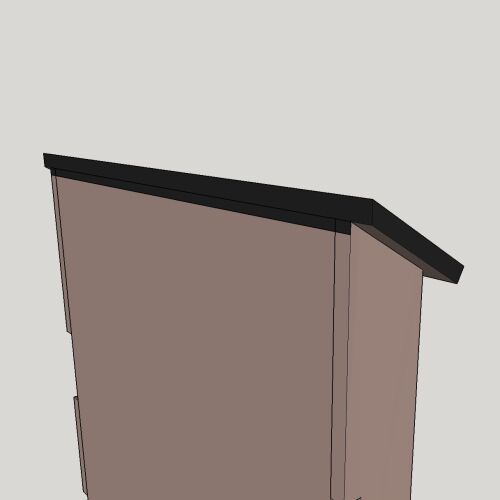
Because we have a sloped roof on the bat house, the front of the roof board will have a square edge and the back edge will be angled to fit flush to the backside of the bat house when assembled.
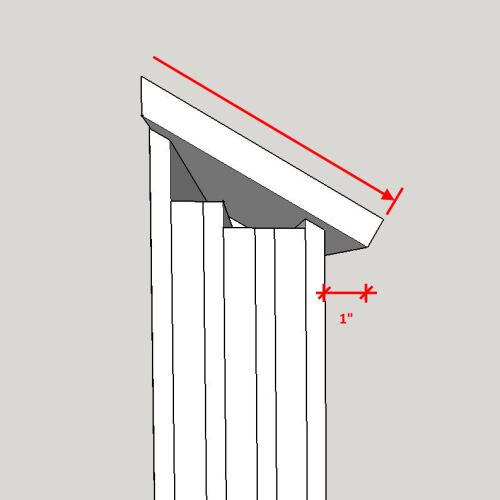
The roof board will overhang the front and sides by about 1”. Since the width of my bat house itself is 27 ½”, the length of the roof board will be 29 ½” to give a 1” overhang on the ends. The width of the roof board will be determined by the thickness of plywood you use on the panels for the house.
For example, this house uses ½” plywood, which gives you 4 panels at ½” thick and 3 spacers at ¾” thick with an overall house depth of 4 ¼”. That means the roof board would be about 6 ¼” to allow for the slope plus 1” overhang in the front.
First, measure, mark, and cut a 29 ½” piece from the 1×8 using a miter saw or circular saw.
Next, take this piece and using a table saw or circular saw set at a 30 degree angle of the roof slope, rip the roof board to width. The angled edge will be on the back of the house and sit flush to the back surface.
Take the remaining 1×8 board and rip it down to 4 ¼”, the size needed for the side walls.
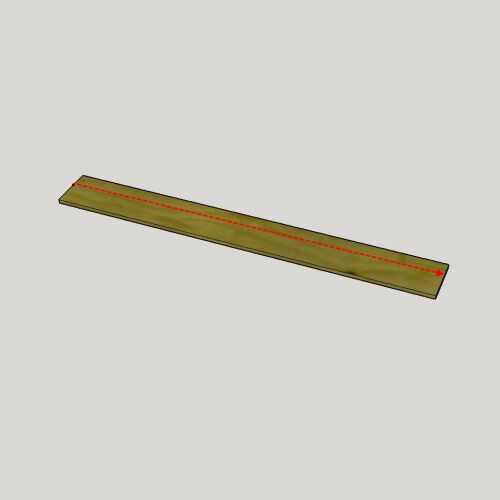
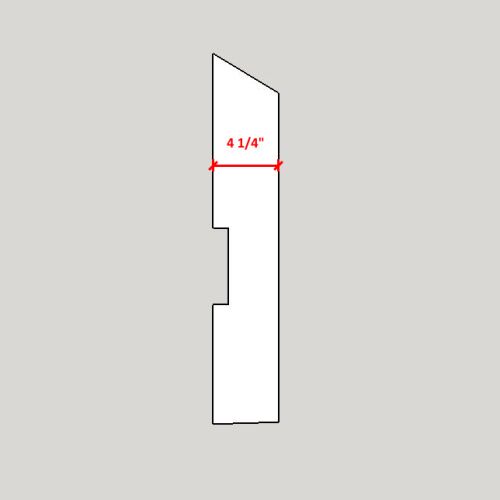
Measure down from one end of the board and make a mark at 24”. This is the measurement from the bottom of the sidewall to the peak of the sidewall after the slope will be cut.
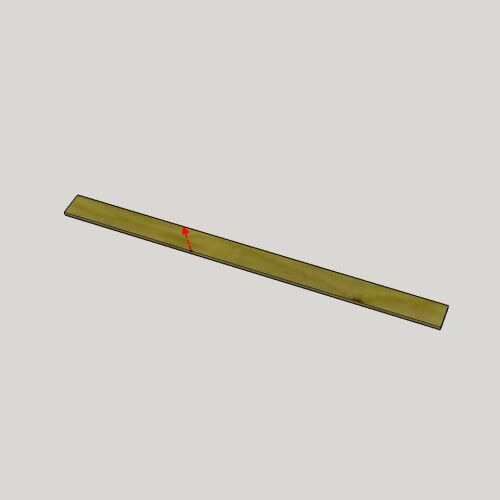
From this mark cut the angle of the roof slope using a miter saw or circular saw. Set this piece aside. Now take the board and mark down from the peak that was just created and cut it again at 24”, but this time a square cut. This is the second sidewall.
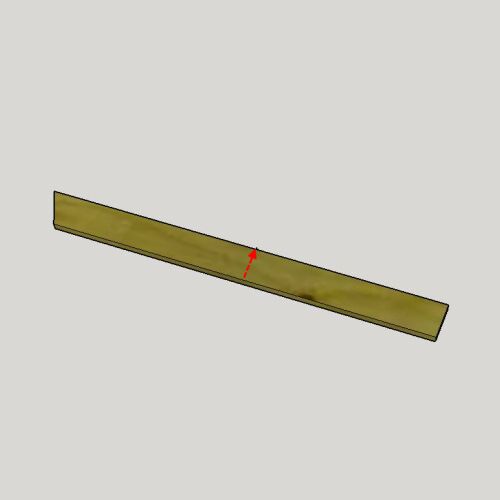
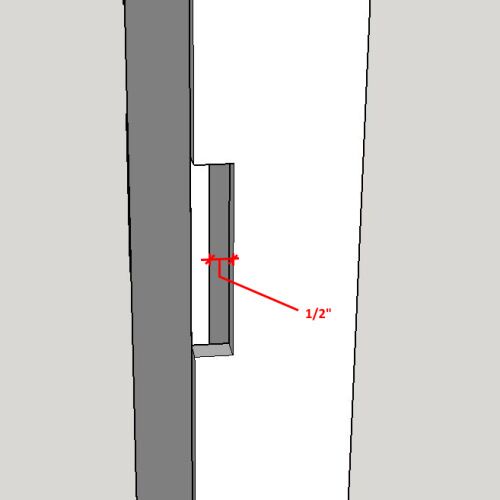
On both sidewall pieces, mark where the side vent will be cut on the backside edge, which is the longer edge on the sidewalls. The vent should allow a ½” space that’s 5” high for air circulation and start about a foot down from the roof peak on the backside of the bat house. Don’t forget to account for the thickness of the backside panel when cutting the vents in the sidewalls.
Our vent starts 11 ¼” down from the peak of the sidewall and is cut out 1” deep and 5” down. The 1” vent allows a ½” gap between the back panel and the sidewall once it is fastened together. Use a hand saw or jigsaw to cut out the vent.
With the longer piece of the remaining 1×8 material, rip the board into 1” wide strips using a table saw or circular saw. These will be used to make the spacers that will go between the plywood panels.
Cut the 1” strips into the sizes below and set them aside.
Next, we’ll cut our panels from the 4×8 piece of plywood. You can use a circular saw or a large table saw to make your cuts.
All 5 of the plywood panels will be the same width so we’ll start by ripping a piece from the plywood sheet that is 26” wide. This will get you 4 of the 5 pieces needed. The 5th piece can be cut from what is left of the plywood.
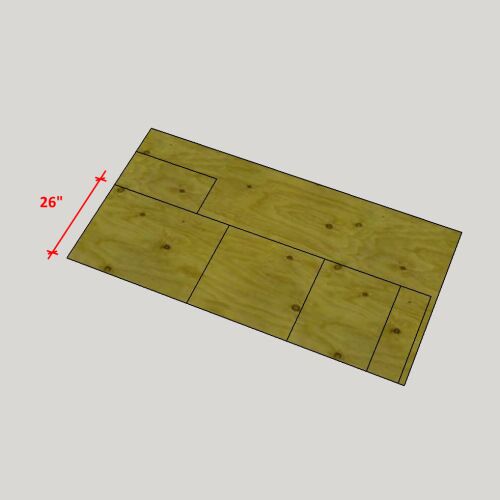
From the 26” wide piece of plywood, cut out the sizes below.
For the last 2 pieces, you need to set the saw at the angle of the slope. These are the top edges of the front and back panels that the roof board will rest upon. The bottom edge of each piece will be square cut. The measurements below are for the longest side of each piece.
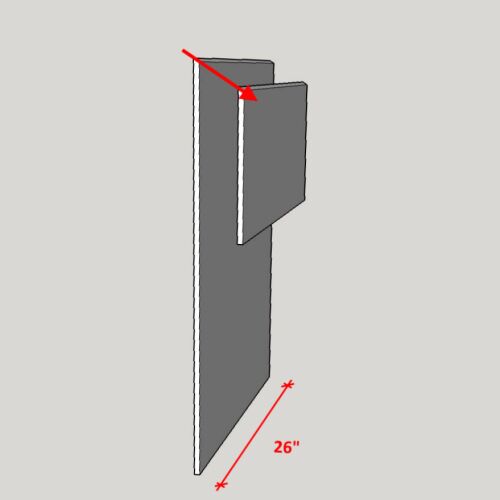
Finally, all inside surfaces of the plywood panels and the inside surface of the roof board will need to have horizontal grooves etched. This helps the bats grip when climbing inside.
The best way to do this is to use a circular saw set at about 1/16” depth of cut. Cut a horizontal groove every ½” going up each piece. Remember, the grooves will run parallel to the 26” long sides.
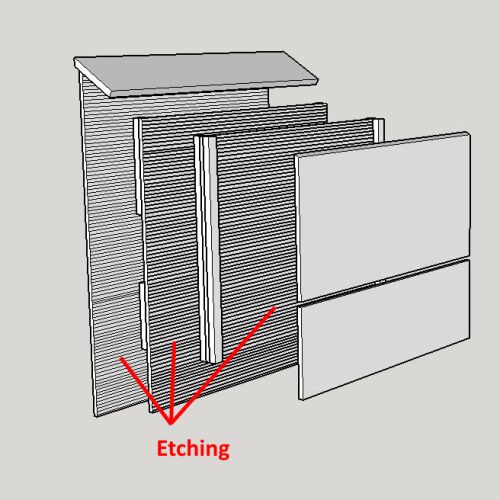
It’s time to seal all of the surfaces that will be facing the inside of the house on each part. This means all of the spacer pieces, both sides of the 2 internal panels, the inside surfaces of the 2 front panels, the inside surface of the back panel. The inside surfaces of the roof and two sidewalls will also need to be sealed.
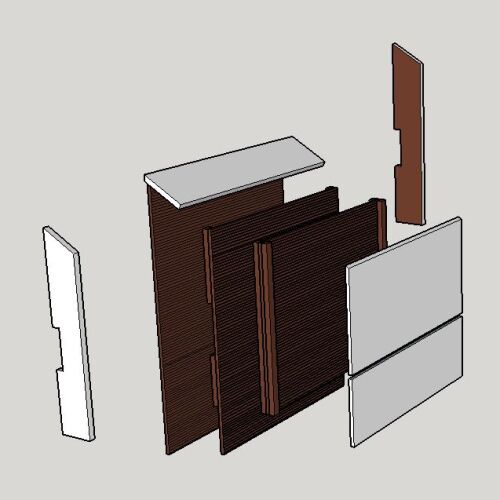
Using a brush, apply the water-based sealer according to the manufacturer’s instructions.
Once the sealer is dry, it’s time for assembly.
We are going to start by assembling the inside panels of the house first.
Gather the four spacers and plywood panel with the length of 21 ⅝”.
Run a bead of caulk about ½” in on one of the vertical edges that run 21 ⅝”. Press one of the spacers onto the bead of caulk and screw it to the panel so that the edges are flush on the outside. Repeat on the other side and then mirror this process on the reverse side.
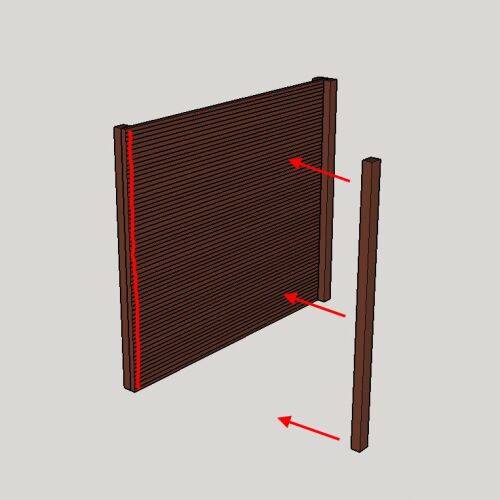
Next, caulk the surface of the spacers on one side and then screw the 28 ⅜” panel onto the spacers so that there’s an overlap of the panel by ⅝”.
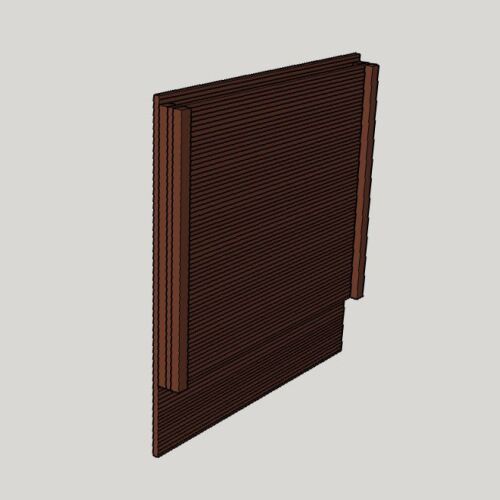
The last step to assemble the inside panels is to caulk and screw the remaining spacers onto the backside of the 28 ⅜” panel.
The 9 ⅛” spacers belong on the top and should be flush to the top and side edges of the plywood panel. Caulk and screw in the spacers.
Measure down 6 ⅝” from the bottom of the 9 ⅛” spacers and make a mark. This is where the 6 ½” spacers will start. Caulk and screw in the remaining spacers on either side so they are flush to the outside edge of the panel.
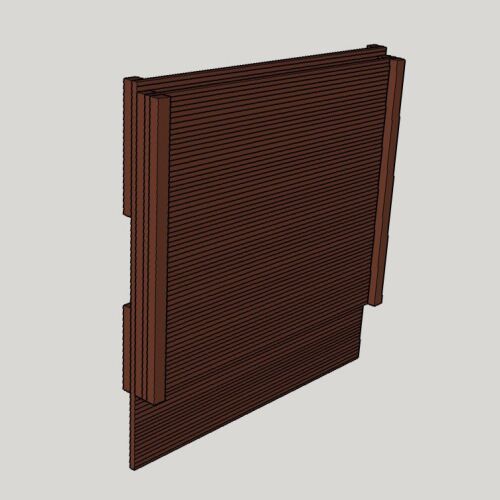
Grab the 36” back panel and the two remaining front panels for the next step.
Lay the assembled panels front side down and run a bead of caulk along the surfaces of the 4 small spacers.
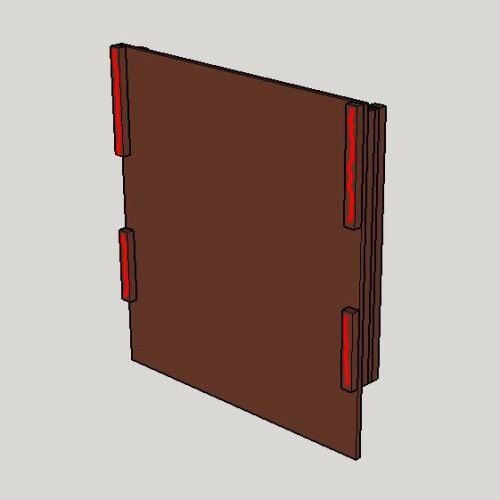
Lay the back panel etched side down onto the spacers so that there is an overlap on top of 1 7/16”. Be sure that the angled edge is on the top. Screw the panel in place so that the edges on the sides are flush.
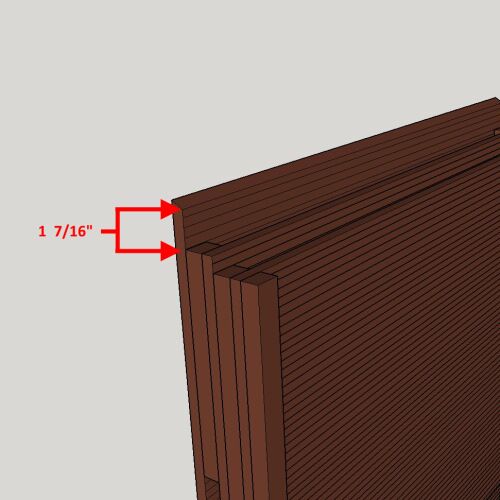
Clean up any caulk that may have been squeezed out on the sides.
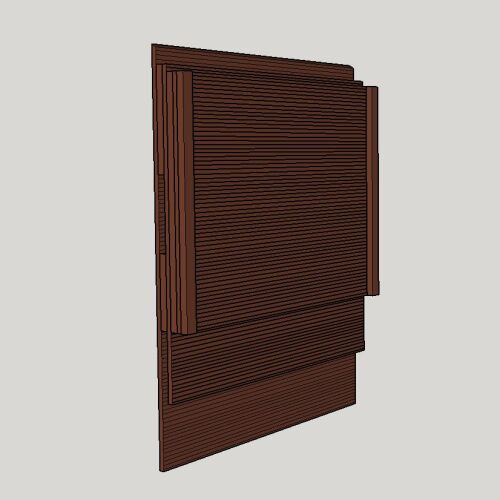
Flip the partially assembled panels over and gather the 2 remaining front pieces.
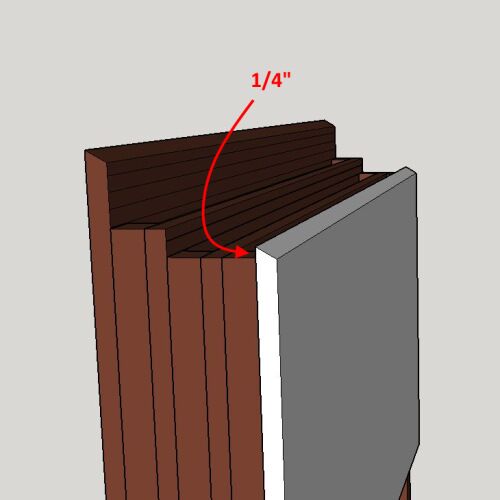
Run a bead of caulk along the surfaces of the two spacers. Take the 13” panel and press it onto the spacers with the sloped edge on top. Screw in place so that the edges are flush on the sides and there is a ¼” overlap on top.
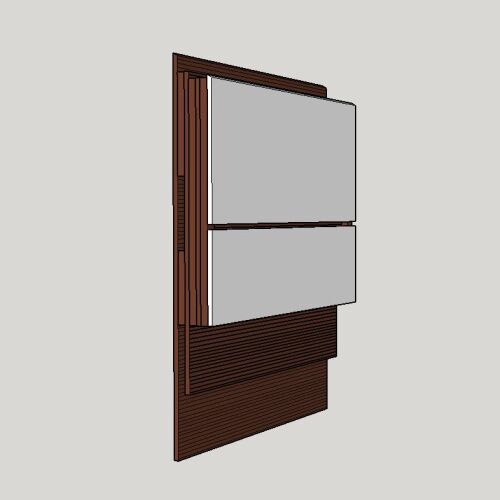
Press the 8 ⅜” panel onto the spacers. Screw it in place so that the bottom and sides are flush with the spacer. This should give you a ½” gap between the two front panels.
All that’s left now for assembly is the sidewalls and roof board.
Turn the assembled panels on their side. Take the sidewall that aligns to this side and run a bead of caulk ½” in on the inside perimeter.

Press the sidewall onto the panels so that the top slope aligns with the slope of the front and back panels.
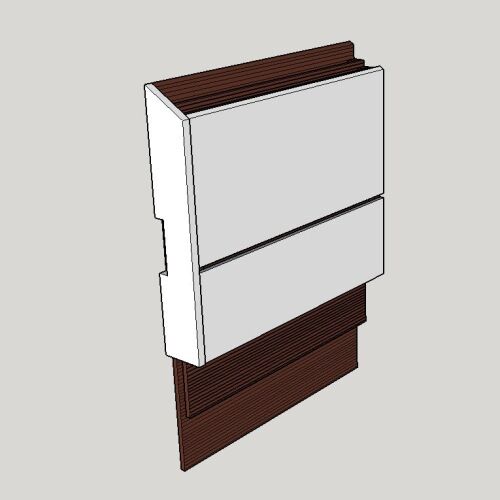
Screw the sidewall into the spacers. Repeat this step on the other side.
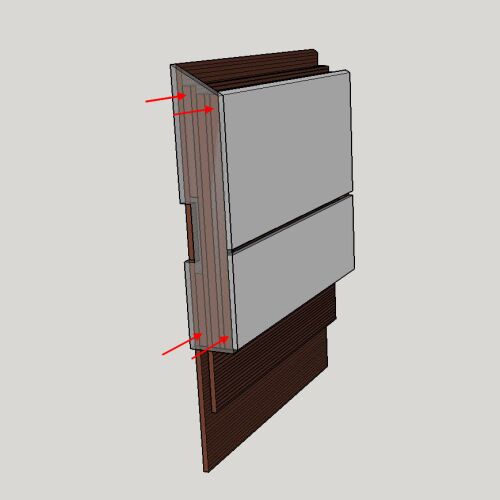
Lay the house on the backside. Run a bead of caulk on the top side edges.
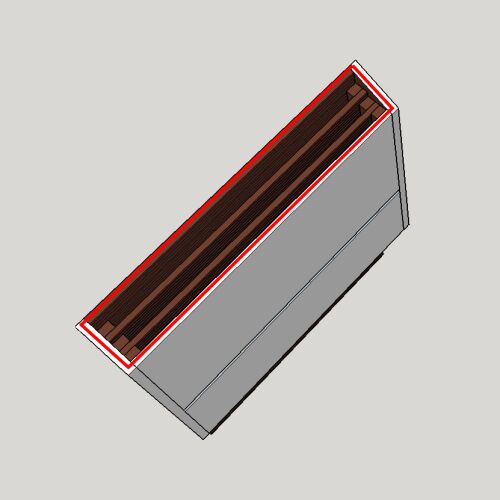
Press the roof board onto the top so that the sloped edge is flush with the backside of the house and overhangs about an inch on the front and sides. Screw the roof board in place through the top into the sidewalls.
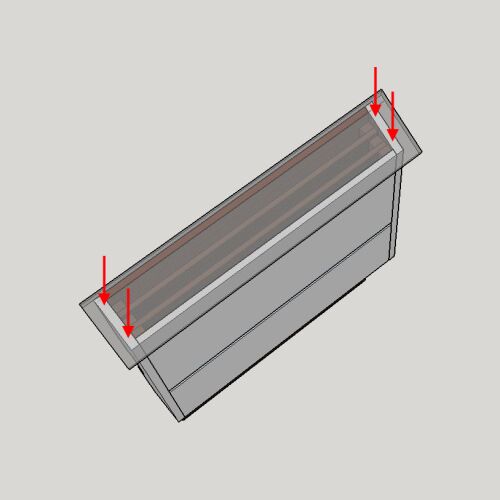
Do one last check to verify the side and front vents are correct, allowing air to circulate through the house. The two panels hanging down from within the house are the landing zones.
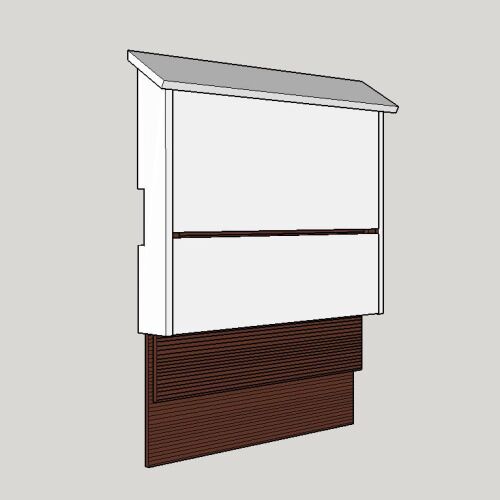
It’s getting there! Next up is painting the house, but first, final caulking is needed.
CAULKING
All places where parts are joined need to be caulked to keep both air and water from intruding. This includes the underside of the roof board where it overhangs and along the joint on the backside where the roof board joins the house.
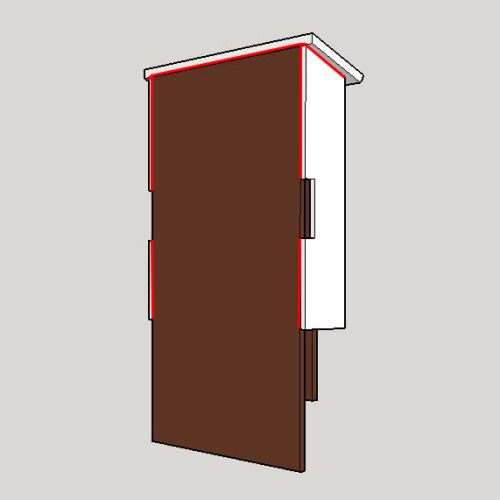
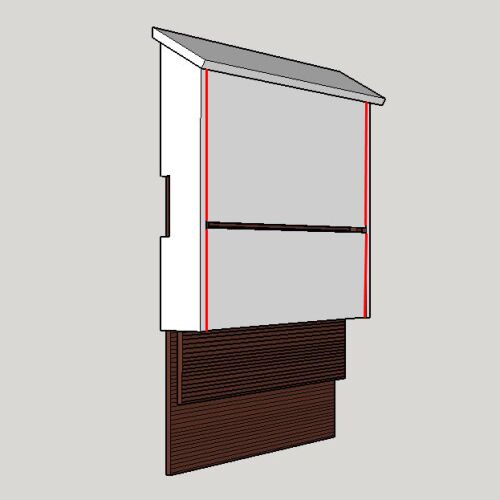
Caulk the joints along the sidewalls where it meets the house. Pay close attention to the vent areas where the sidewall meets the back panel. Caulk this small joint as well as caulk over the edge of the back panel and on the edges of the sidewall, especially where exposed grain is present.
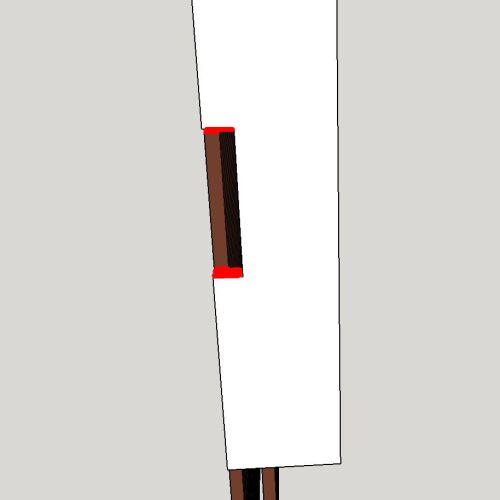
Spread a layer of caulk on either end of the roof board and the bottom edge of sidewalls. These areas are exposed end grain and need to be sealed.
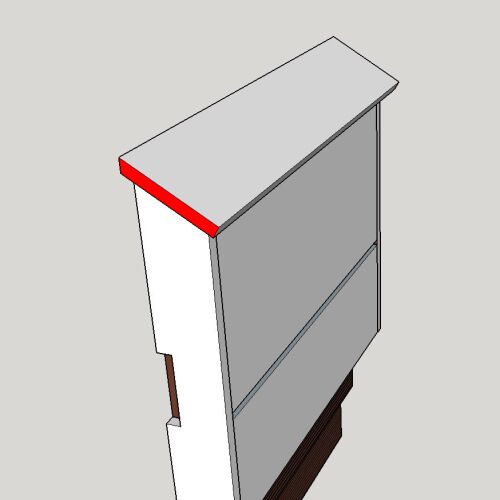
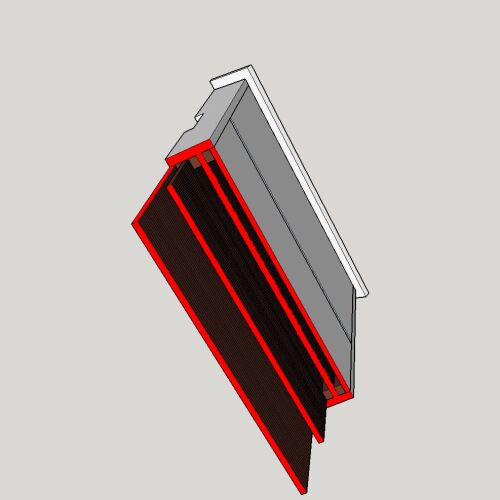
Spread a layer of caulk on the 3 edges of each landing zone.
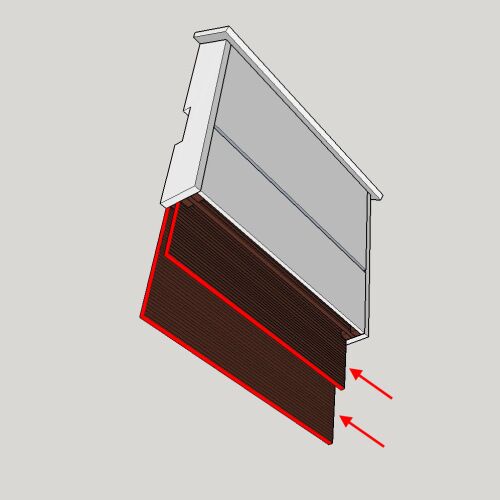
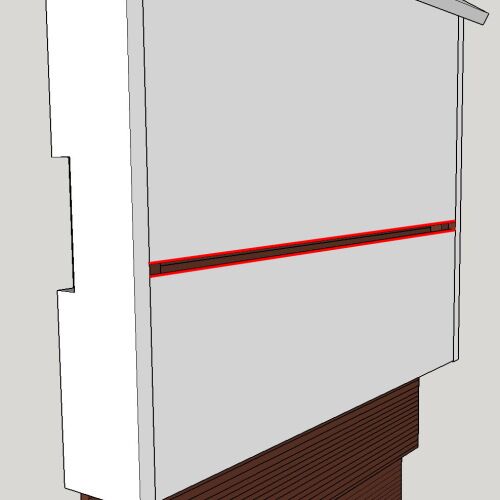
Also apply caulk on the two edges of the front panels that form the front vent and on the bottom edge of the lower front panel.
As a final caulking step, be sure all screw heads are caulked so no water can intrude.
PAINTING
After the caulk has cured, it’s time to paint.
Start by brushing on a coat of water-based exterior-grade primer. With the exception of the two landing zones, all outside surfaces should be coated including the underside of the roof board overhang and along all caulk joints. Be sure to get a good coat on the edges of the side and front air vents and on all edges with end grain.
After the primer has cured, brush on two coats of water-based exterior grade paint, again, with the exception of the two landing zones.
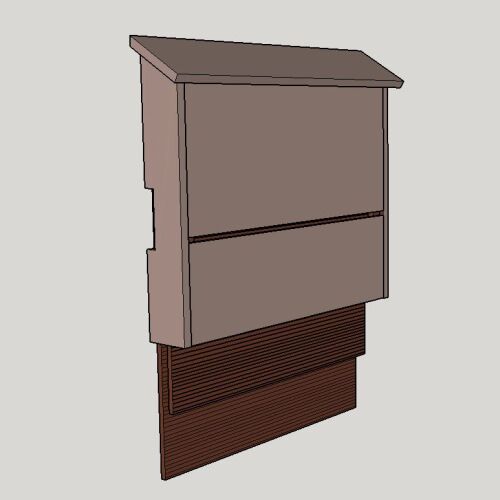
What color should you paint the bat house you ask? It depends where you live. Check out this handy map by Bat Conservation and Management that will help guide you in the right direction.
Being in Florida, I leaned closer to medium brown color.
ROOFING
Time to add some roofing.
If you do a really great job caulking and painting your house it will last a very long time in the elements without roofing materials, but adding them will make it last even longer.
There are several roofing solutions and several types of materials you could use for your bat house including shingles or metal roofing. The important thing is to seal over the screws on the top of the roof board and along the joint on the backside of the house where the roof board meets the back panel.
To keep it simple, I am using a roof sealer called Leak Stopper Rubber Flexx that you can get from Amazon for under $10.
The first step was to mask off the house to prevent overspray from getting where I didn’t want it.
Following the manufacturer’s instructions, spray the entire top surface, the front edge, and the side edges. Be sure to coat over the peak and down the backside edge just past the caulk line about a half-inch. Ease the peak’s edge with some sandpaper first if it is too sharp. This will allow good adhesion of the roofing sealer.
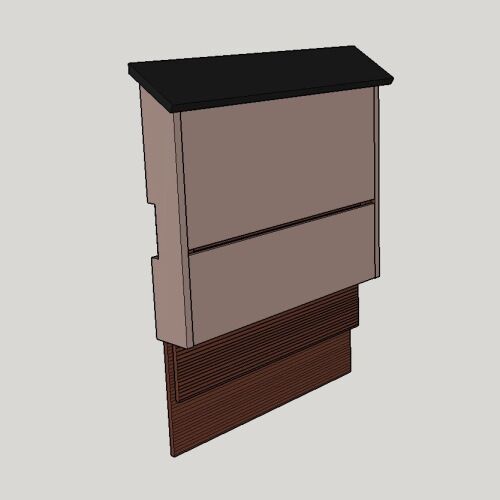
After your bat house is complete, it’s ready for installation. Depending on the way you plan to install it will determine what hardware you’ll need to add to the backside of the bat house.
A bat house like the one we built today will do best on a tall pole or post. It is important to remember to make sure screws do not penetrate through the panels into the inside of the house where bats will be living. To prevent this from happening, only screw hanging cleats, boards, or other hardware into the sidewalls of the bat house before hanging on a pole or post.
Now it’s time to sit back and pray bats move in quickly so the mosquitos move out quickly. It may take some time for bats to find your house, but if you did a good job they will eventually move in and start clearing your yard of pests and you can enjoy your new nocturnal neighbors.